|
|
 |
|
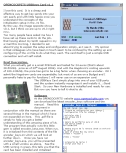
 What
Does What and Where It Does It. What
Does What and Where It Does It.
|

|
 The control, navigation, electrical, hydraulic and logic systems
of a Boeing 737NG are what you might describe as complex.
So, the more we try to simulate, the more complex our setups
become. We all start at the bottom with our Flight
Sim, our favourite Add On Aircraft and the 'Must Have'
Joystick. That's when it starts to get serious......
The control, navigation, electrical, hydraulic and logic systems
of a Boeing 737NG are what you might describe as complex.
So, the more we try to simulate, the more complex our setups
become. We all start at the bottom with our Flight
Sim, our favourite Add On Aircraft and the 'Must Have'
Joystick. That's when it starts to get serious......
For my project, I
decided to go with the most popular short to medium range
airliner of the time, the 737NG because it's modern, quick to
turn round and fun.
I chose the PMDG because apart from it being a very acceptable
visual and flight model, i could communicate with it via
hardware MCP and CDU units. In addition, the NavData Airac cycle
is updated every 28 days so i am always 'current'
Trying to describe how everything works will be a very long and
complex operation, so i will try to simplify it as much as
possible by catagorising controls, inputs, outputs and
individual items.
Remember these words.....AXES,
KEYSENDS,
MOUSECLICKS and INTERNAL OFFSETS & PARAMETERS .
These are the means whereby you actually control just
about every switch, lever and control that your aircraft
developer builds in to his flight model. The first
three are relatively easy to address, the fourth is a sort of
grey area where you bounce between the amazing array of control
that Pete Dowson gives us in FSUIPC and expensive
Hardware/Software. I tried to stay away from
expensive programming and hardware, but you have to have a nice
MCP and CDU don't you. That's my only failing :o)
INSTRUMENTS
|

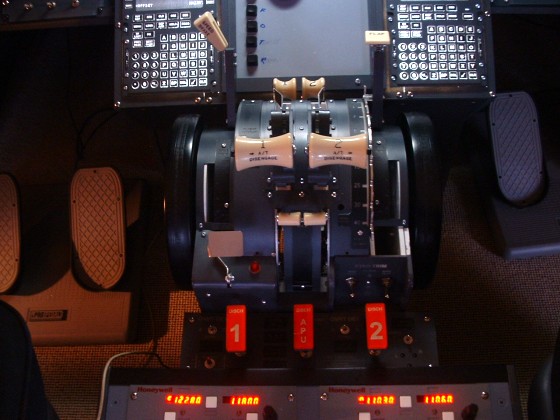
BU0836 controls my TQ Axes. 2
throttles, 2 reversers, Flaps and Spoiler Lever.
Also controls the buttons in the TQ. Two BU0836X are attached
to my overhead to give me 64 joystick button inputs
which FSUIPC catches and translates into Macro's which action the switches on the software panel. 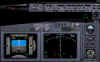

|
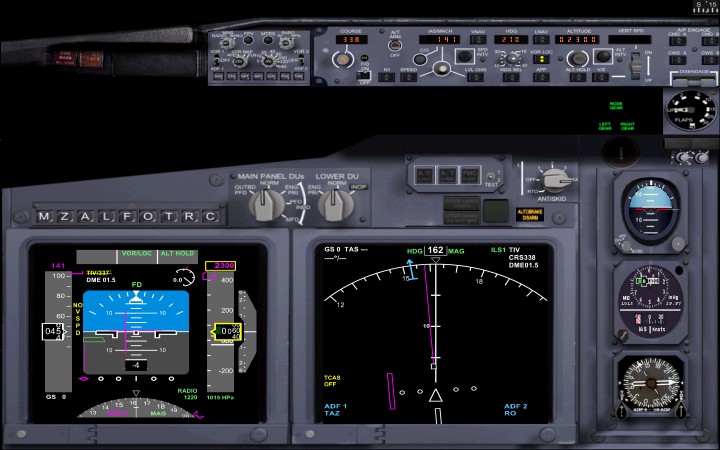
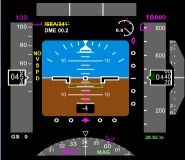
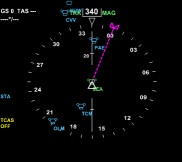
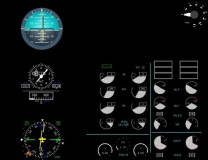
PRIMARY
FLIGHT DISPLAY & NAVIGATION DISPLAY. First thing I
did was to seperate the outside view and the panel so i could have the
instruments on a second monitor. I've lifted
these from the actual PMDG 737NG Aircraft by re-writing the
Panel.cfg file. There's 2 examples of re-written files on the
left which i did for other people. My panel only
contains the Instruments i need. I used the PMDG
internal instruments because my CDU is programmed with the route
and it displays in the aircraft ND. The AIRAC is always
current via Navigraph and of course the FMA's are being
displayed in real time as inputted to the CPFlight MCP.
If you want to know how to do this, see the 'Using PMDG for
Cockpit Building' Page HERE for
more information on how it was done.
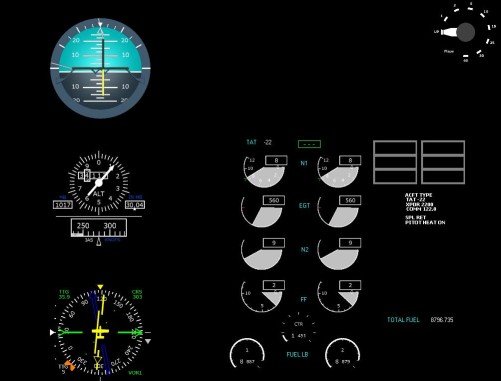
EICAS SCREENS Then I had to fill the centre EICAS screen,
get the standby instruments up and have a rotary flaps gauge.
So, i got these by using the excellent FSXpand from Gert Heijnis.
This is a 2 part program (the server is FSXpand, lives on the FS
machine and FSClient which i run on a networked
machine). See the FSXpand
page HERE or their website HERE
|


|
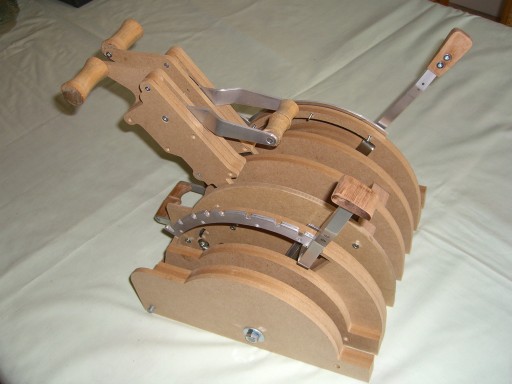
BU0836
(and now the all new BU0836X) Joystick Controller Card.
They're cheap, accurate and reliable. The BU0836 (and
X) card
acts just like the 'guts' of your joystick. You attach
potentiometers to them which control the action of any function
within your sim which requires input from you over a range like
elevator, aileron and throttle. These cards 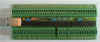 allows the
control of upto 8 analogue axes and additionally give you an
extra 32 joystick buttons to use to input commands either direct
to FS, to your aircraft or thru FSUIPC as a keysend or direct
command. Now available in 12bit version. Click here
for more information. allows the
control of upto 8 analogue axes and additionally give you an
extra 32 joystick buttons to use to input commands either direct
to FS, to your aircraft or thru FSUIPC as a keysend or direct
command. Now available in 12bit version. Click here
for more information.
Windows will see these cards as just another joystick, so just plug it
in and away you go.
I use four of these cards, one is installed in the TQ (see HERE)
to govern the Lever Axes and TQ pushbuttons (the Steering Tiller is
also connected to this card) and the other controls numerous hardware switches in the
overhead (the new Overhead will have two called CiM Overhead
Controller1 and 2). Leo has uploaded a connection diagram at his website.
Using diodes,
you can input using closed (toggle) switches.
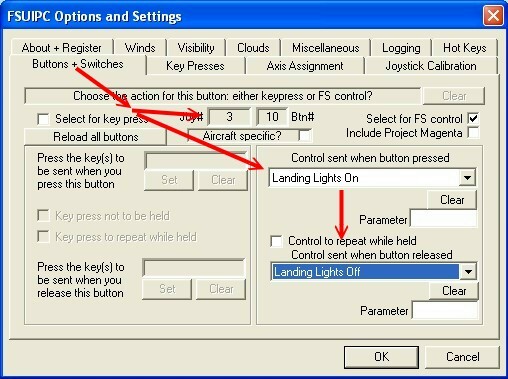
The BU0836 Joystick Buttons are read by FSUIPC and translated into
either a Keystroke, a Direct Action Command into FS or the new Mouse
macro's. You
can even assign one action when the switch is closed (ON) and another
when the switched is opened (OFF). For example, Landing Lights
On (or OFF), Strobes On (or OFF) etc. The list is extensive, take a
look at the FSUIPC Menu.
All in all, a very cheap and accurate solution to control joystick
axes and buttons.
|
BUILDING
A TQ?
Hook it up via the BU0836 Controller.
HERE's
HOW
|
|
The
CPFlight MCP communicates with
the PMDG by way of the FS_COM utility which they provide in their
CPFlight Tools package. Once set up correctly, it is 100%
reliable and faithfully reproduces the commands and behaviour of
the Boeing MCP. This is a 'must have' addition to any
cockpit. there's a basic explanation of what it does HERE.
|
10/10
for this one chaps :o)
|
The
CPFlight MCPEX1 is the first
expansion board i bought. It connects via the MCP and is
configured by way of the MCP_CONF utility which CPFlight again
give you in the CPFlightTools Package. 64 digital inputs
for switches or pushbuttons give a lot of room for
expansion. I use all of them. Each input can
be configured for a direct FS command or to send a key
forward. There are 10 relay outputs which i use to light
several LED's at certain action times like the landing gear,
parking brake Indicator and the stall warner etc. All in
all a good add-on if you have the CPFlight MCP. I found
the inputs for the variable potentiometers a little too
unreliable, so i dont use these at all. I prefer the
accuracy which the BU0836 gives me.
|
8/10
only the axes sensitivities let it
down.
A Good Add On If You have the
MCP737
|
|
The
CPFlight MIP737
OK i had a bad experience with my first MIP737 board. I just
could not get it to work properly. After intense e-mails
with Paolo at CPFlight, he agreed to replace it. It turned
out that i had a faulty unit. You cant bitch about the
backup CPFlight give, it is first class. Now we have
the MIP annunciators running true to form with one small
exception, the autobrake disarm, but Paolo is going to look
at the way FS_COM reads the data from FSUIPC and correct
it. Read the manual at CPFLIGHT here for the list of
functions and available annunciators that you can lift with the
PMDG using the MIP737. I take back everything i said about
this board now it works :o)
|
8/10
Adds that certain something to the MIP
when the annunciators light up
|
|
The
ENGRAVITY CDU is another 'Must Have' Unit. You
have to buy the interface software from PMDG for $99 to run it
with the PMDG 737NG, but trust me it's money well spent. (Well
it isn't now because of some Political Motivation over a
copyright issue, this driver is no longer available).
This unit
gives you exactly what you see on the software CDU. Every
page and function is authentically reproduced. It's
so much more realistic commanding your aircraft's flight route
and performance inputting via the keypad and reading out the
results on the built in LCD Display. Every aspect of
performance, routing, navigation is faithfully reproduced
exactly as you would see it on the
screen. And having had experience of
FlyEngravity's backup service and repair facility (i dropped my
CDU), I highly recommend this add-on. If you're going
to buy something for your 'PIT', buy this and the CPFlight MCP
First.
|
|
|
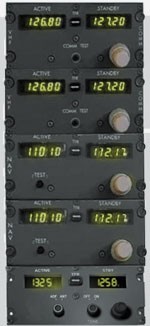
NAV & COM Radios The Nav/Com
Radios are from Flight Illusion. I bought a set of 2 Comm, 2 Nav
and the ADF from Mark because at the Lelystad show 2006, he had
a special deal if you bought the 5 he would throw in the GSA-55
controller. I have to say they work
exceptionally well and after a year of service, they are still
beavering away everyday. Reliable and
effective. The only drawback is that they do
not make a Transponder. But that's not the end of the
world, our Italian colleagues do :o)
The 737NG TRANSPONDER came from CPFlight. It's OK, but
there is an abnormality with it. In the standby position
it displays F8888 (a test display) and not the actual squawk
code. so you have to turn the Transponder to an active
mode to change the squawk code. Paolo tells me
he cannot do anything about this because the function is in the
firmware which he cannot change. Wouldn't it be nice
if everything worked as it should.
|

|
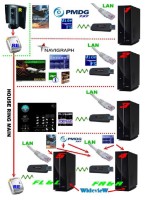
 FSUIPC
This has got to be the most important and popular interface add
on's we have available. A
registered version gives you unparallel access to so many
functions, actions and possibilities. All
references made and functions described here are for a
registered version. Because
FSUIPC is a module, it loads and works as part of
FS. FSUIPC reads and writes data to FS.
It is the interface that allows you to do something and then
translates that input into an action which it commands FS to
execute. It also reads data and sends it
back to your add-on or aircraft as a user friendly output which
is delivered to 3rd party programs like FSXpand/FSClient,
Squawkbox and Active Sky. So it follows that it, as
well as FS or your add-on, is waiting to read and act on an
input. It sees joystick buttons and can then
translate that button press into an exact given function or a
keysend. Not only that, it gives you one action when you
press the button and another when you release the button.
So connect a toggle switch and send the button via a BU0836 Joystick
Controller Card and one switch will give you a distinct
ON/OFF instead of a 'Toggle'. Read
the manual and experiment. Spend the weekend playing
with the FSUIPC menu's. It's time well spent and you
have the rest of your life to enjoy the benefits :o) FSUIPC
This has got to be the most important and popular interface add
on's we have available. A
registered version gives you unparallel access to so many
functions, actions and possibilities. All
references made and functions described here are for a
registered version. Because
FSUIPC is a module, it loads and works as part of
FS. FSUIPC reads and writes data to FS.
It is the interface that allows you to do something and then
translates that input into an action which it commands FS to
execute. It also reads data and sends it
back to your add-on or aircraft as a user friendly output which
is delivered to 3rd party programs like FSXpand/FSClient,
Squawkbox and Active Sky. So it follows that it, as
well as FS or your add-on, is waiting to read and act on an
input. It sees joystick buttons and can then
translate that button press into an exact given function or a
keysend. Not only that, it gives you one action when you
press the button and another when you release the button.
So connect a toggle switch and send the button via a BU0836 Joystick
Controller Card and one switch will give you a distinct
ON/OFF instead of a 'Toggle'. Read
the manual and experiment. Spend the weekend playing
with the FSUIPC menu's. It's time well spent and you
have the rest of your life to enjoy the benefits :o)
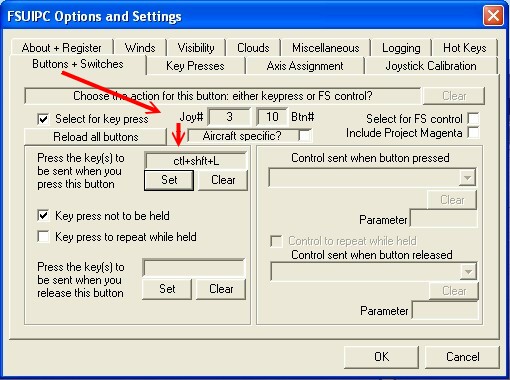
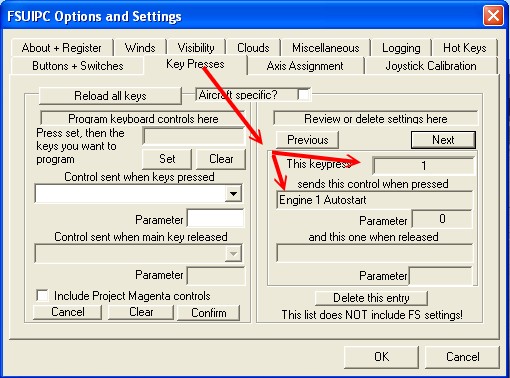
 FSUIPC also reads keysends (whether you have pressed the
keyboard or use a keyboard emulator). These keysends are
again translated into actions as are the joystick buttons.
FSUIPC also reads keysends (whether you have pressed the
keyboard or use a keyboard emulator). These keysends are
again translated into actions as are the joystick buttons.
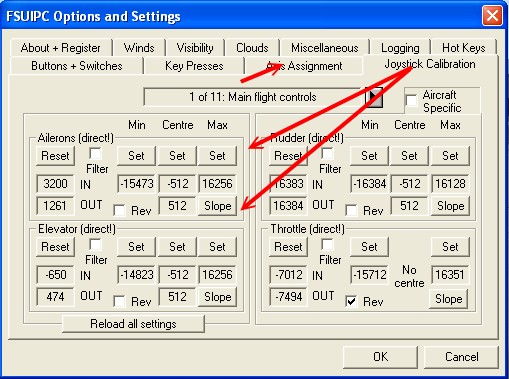
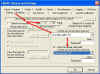
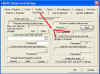
Then you have the Axis (Axes) Menu Pages. You assign your
axis first on the assignment page, then calibrate and fine tune
it in the Calibration pages. I have removed control
of all the Axes from FS and send them all to FSUIPC for
processing. Much more accurate i
reckon. The clever thing
Pete Dowson has done is to include the function of
accurate positioning on the axis in steps. A good
example is the FLAPS. I have 9 flap positions
ranging from 0 to 40 degrees. On the TQ, the flaps
handle sits in little detentes at each flaps
position. I am now able to calibrate that position
exactly, so when i set flaps 15, that's exactly what i get.
I am only trying to give you an insight into what i do with
FSUIPC. It is such an amazing program that i suggest you
read the manual that Pete gives you in the download zip and
understand what it is capable of. You are going to
be amazed. It's such a inexpensive way to get
a whole lot more out of (and into) your sim.
|
|
|
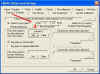
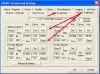
 AXES
Accurate and realistic control of your aircraft is a must.
Therefore it follows that correct calibration and sensitivities
are important for successful operation. All inputs whether
they be from the Yoke,Rudders or the TQ are calibrated in the
Windows Game Controllers Page first. Once
calibrated, i disable any influence on the controls from FS
itself. All axes are assigned and configured from within FSUIPC, first
by assigning them in the Axis Assignment Page and then
'tweaking' them in the Joystick Calibration Page. Read the
FSUIPC Manual for instructions how to do this. You
can get it HERE AXES
Accurate and realistic control of your aircraft is a must.
Therefore it follows that correct calibration and sensitivities
are important for successful operation. All inputs whether
they be from the Yoke,Rudders or the TQ are calibrated in the
Windows Game Controllers Page first. Once
calibrated, i disable any influence on the controls from FS
itself. All axes are assigned and configured from within FSUIPC, first
by assigning them in the Axis Assignment Page and then
'tweaking' them in the Joystick Calibration Page. Read the
FSUIPC Manual for instructions how to do this. You
can get it HERE
Axes assigned in FSUIPC are both Yokes, using the X & Y axes
on seperate BU0836X boards so i can 'centre' them. All 3
axes on each set of rudder pedals, the Steering Tillers and the
6 TQ axes.
|
|
|
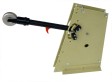
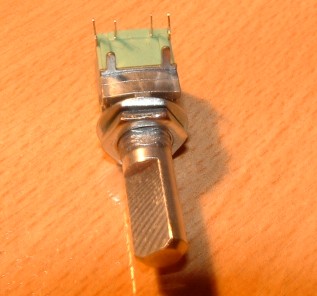
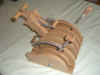
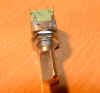
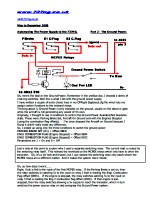
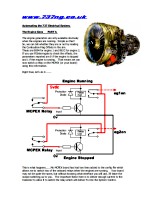
Manual Trim. The
Symulatory TQ trim wheel shaft is fitted with a gear which
originally rotated an encoder. I have replaced the encoder
with a pulse switch and then connected that to two of the
joystick button inputs on the BU0836 card. What the switch
does is only contact (ON/OFF Momentarily at each detente) in the
direction of rotation. So as i turn the trim wheel, i get
a single (or continuous) On/Off switch state on the joystick
button which is connected to that directional input. This
has the same effect as repeatedly pressing a joystick
button. Then the button is assigned in FSUIPC as Elevator
Trim UP or DOWN (depending on which way the shaft is turned),
resulting in accurate control of the elevator trim. I've
wired this thru the Stab Trim Switch on the TQ so i am able to switch
manual trim on and off
There's more information about PULSE SWITCHES on the TECHNICAL
PAGE including links to Data Sheets.
|
|
|
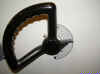
Nosewheel Steering Both Steering Tiller's came from ROUTECH
in Romania. I made a small frame to join a centre shaft passed
thro the tiller to a potentiometer. This in turn has been
connected to one of the Axes on Leo's
BU0836 Controller Card. FSUIPC allows you now to
assign a Joystick Axis to the nosewheel steering. The
Steering Tiller and the Rudder have an in built 'Speed Curve' (MaxSteerSpeed)
whereby Pete Dowson has set a value under which the Tiller has
authority and over which the rudder has command (for example
50kts). As speed increases on the ground, control passes
progressively from the tiller to the rudder and vice
versa. Works very well and is very accurate.
|
|
|
|
|
|
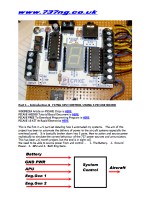
The
Electrical System. I have now managed to
Automate the Electrical Systems. This was a
project that took me 9 months to complete. It was great
fun and a real challenge. I'm writing up the
docs at the moment (10th Jan 2010).
|
|
|
The
Following Items are Not used any longer, but i have left the
information in here because i still get asked about them from
time to time.
|
|
 USBKEYS Card Comes from OPENCOCKPITS
in Spain. It's a keyboard emulator, that is, by bridging
across any two
points on a 11 x 8 matrix, you can send upto 88
seperate key combinations which will be read by FSUIPC, FS or
your Add-On Aircraft/Utility. They are very cheap,
reliable and once you get your head round connecting to it and
writing the .ini file, they are a dawdle to use. Drawback is they
don't like switches which are left permanently on unless you use
diodes in the matrix and they
also don't repeat keysends.
USBKEYS Card Comes from OPENCOCKPITS
in Spain. It's a keyboard emulator, that is, by bridging
across any two
points on a 11 x 8 matrix, you can send upto 88
seperate key combinations which will be read by FSUIPC, FS or
your Add-On Aircraft/Utility. They are very cheap,
reliable and once you get your head round connecting to it and
writing the .ini file, they are a dawdle to use. Drawback is they
don't like switches which are left permanently on unless you use
diodes in the matrix and they
also don't repeat keysends.
There's a .pdf file HERE to
make life easier when trying to set up your OPENCOCKPITS USB
Keys card.... Go on, be adventurous.
|
|
 GoFlight
RP48 Remote Kit I have tried several ways to
get rotary encoder input into the sim succesfully, but unless
you want to spend a fortune, this is the most simple way i have
found. It works, FSUIPC recognises this Remote Kit
as though it was an actual GoFlight RP48. Consequently,
you can assign any FSUIPC function (or send a keystroke) from
each of the 4 encoder inputs per board. Each encoder is
recognised as four seperate buttons, one for CW and one for CCW
dependant on whether you rotate them slowly or quickly. Additionally, you also
have the ability to add 8 more joystick pushbuttons (and have
LED outputs (dependant on what you use the buttons
for). There is a need for
different inputs based on the direction of rotation of a
control. Good examples are
the Trim (up/down), EFIS Control Functions or any other
repetative input based on the direction of a control. GoFlight
RP48 Remote Kit I have tried several ways to
get rotary encoder input into the sim succesfully, but unless
you want to spend a fortune, this is the most simple way i have
found. It works, FSUIPC recognises this Remote Kit
as though it was an actual GoFlight RP48. Consequently,
you can assign any FSUIPC function (or send a keystroke) from
each of the 4 encoder inputs per board. Each encoder is
recognised as four seperate buttons, one for CW and one for CCW
dependant on whether you rotate them slowly or quickly. Additionally, you also
have the ability to add 8 more joystick pushbuttons (and have
LED outputs (dependant on what you use the buttons
for). There is a need for
different inputs based on the direction of rotation of a
control. Good examples are
the Trim (up/down), EFIS Control Functions or any other
repetative input based on the direction of a control.
The reason i wanted an encoder for button switching input was that I found
potentiometers too 'twitchy' and
inaccurate. One word of
warning, the GoFlight remote encoders come mounted on a board
and do not have a threaded collar, so you cannot attach them
thru a lightplate. I found a replacement encoder
from ALPHA in Taiwan at MOUSER ELECTRONICS. Here's
the DATA SHEET.
It's also available with a push action switch for use on the EFIS
units.
There's a very good document HERE
at GoFlight about using the RP48 with the PMDG
|

700111 Encoder
|
|
|